Workspace Member Management - Members
The Members section of Workspace Member Management allows Workspace administrators to take action on members and assign/unassign them from communities.
Path: Workspace Homepage >> Apps Icon >> Member Management >> Members
With the Workspace Member Management Panel, Workspace administrators have the ability to add/ban members, assign/unassign communities, add/remove them from groups as well add new Workspace admins providing ultimate flexibility and efficiency.

The Member's panel of Member management is comprised of the following:
Sorting
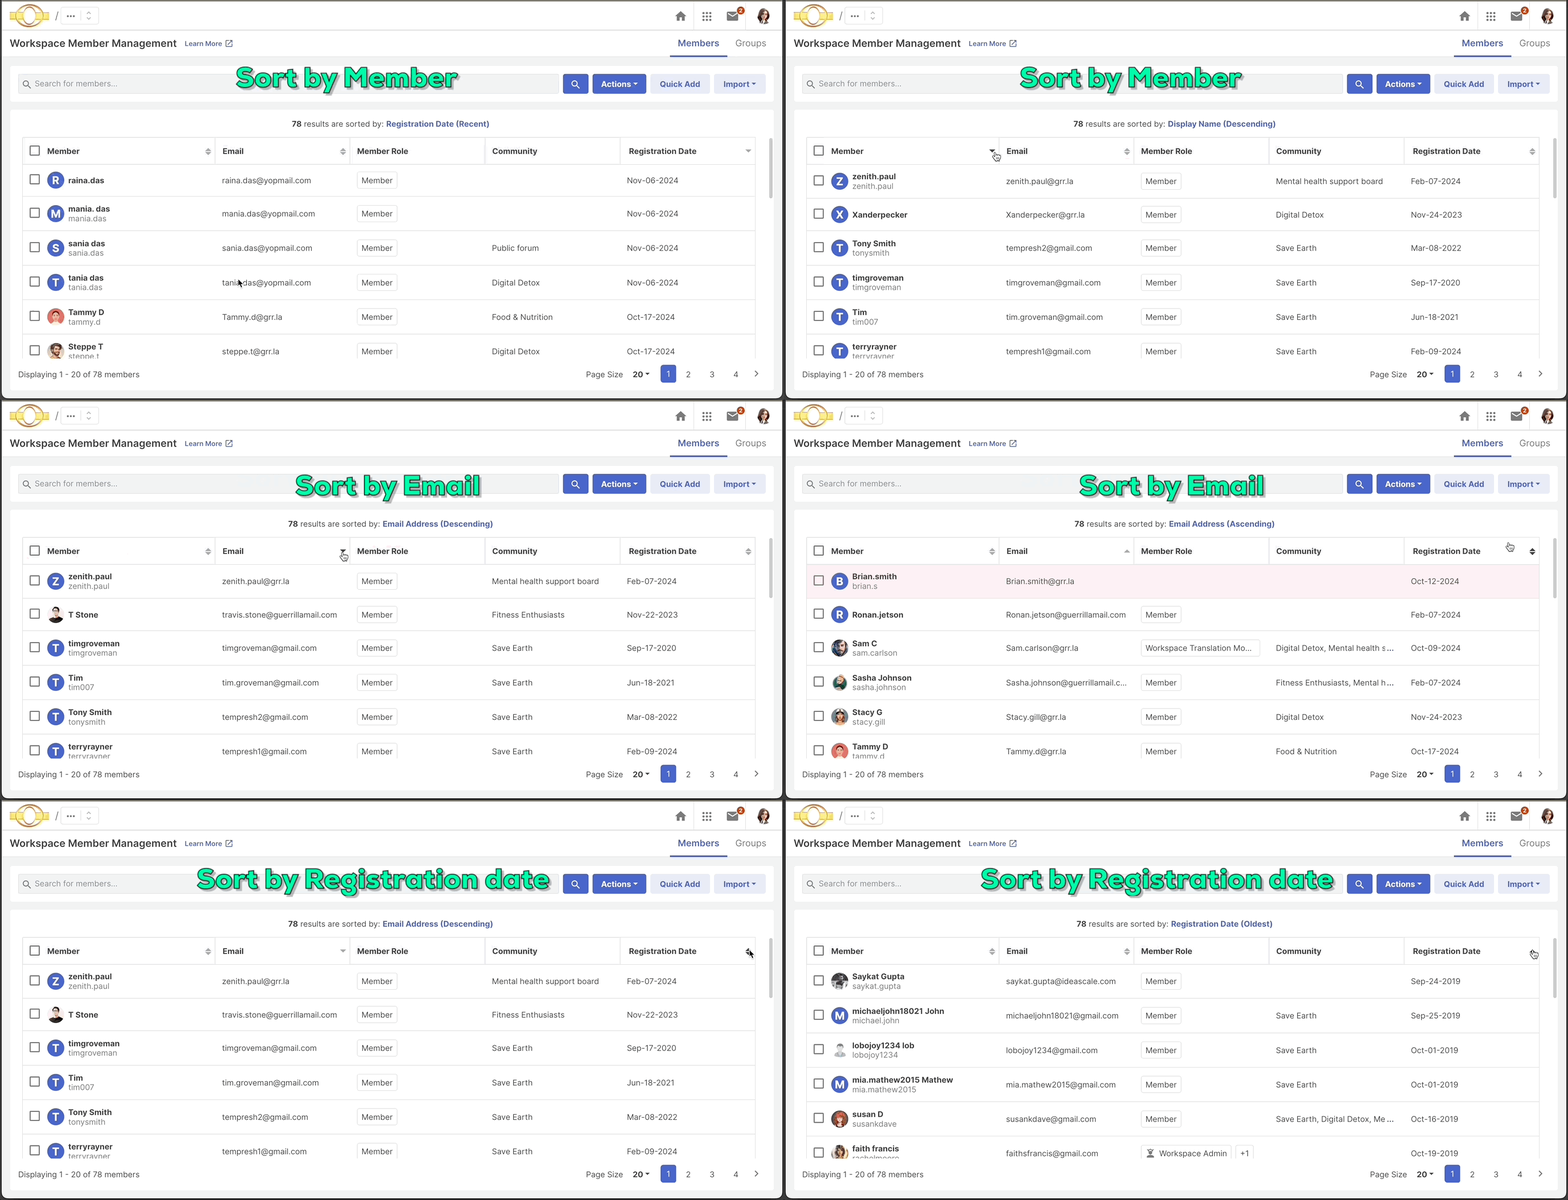
By default, the member list in Member Management is sorted by the registration date, displaying the latest registered members first. However, Workspace admins can sort the following columns:
1. Member: Member display names can be sorted in alphabetical order, either in ascending or descending format.
2. Email: The email addresses of members can be sorted, alphabetically, in either ascending or descending order. Note: The email addresses with uppercase alphabets will be sorted first followed by the lowercase alphabets.
3. Registration date: Member registration dates can be sorted in ascending or descending order, displaying the oldest or latest member first.
Search bar
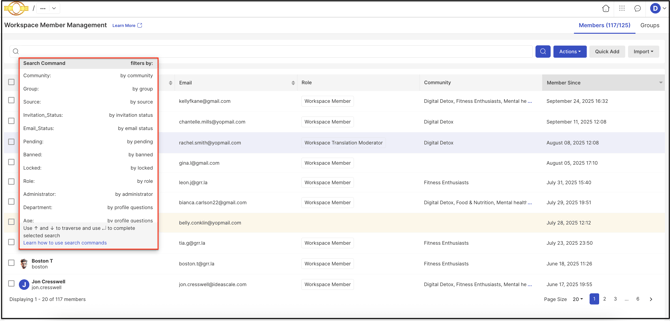
The member management's search bar is equipped with a range of filters tailored to the community's needs. These filters make it quick and easy to find the specific members. The filters available depend on the settings of the workspace, including groups, member profile fields, and other listed filters.
Search also find members by entering email address, name, username, email, or registration date.
Help Article on Search commands on Member Management
Member Selection
Workspace admin can select single, multiple or all members.
- Single/multiple selection: Click on the checkbox besides the member name to select them.
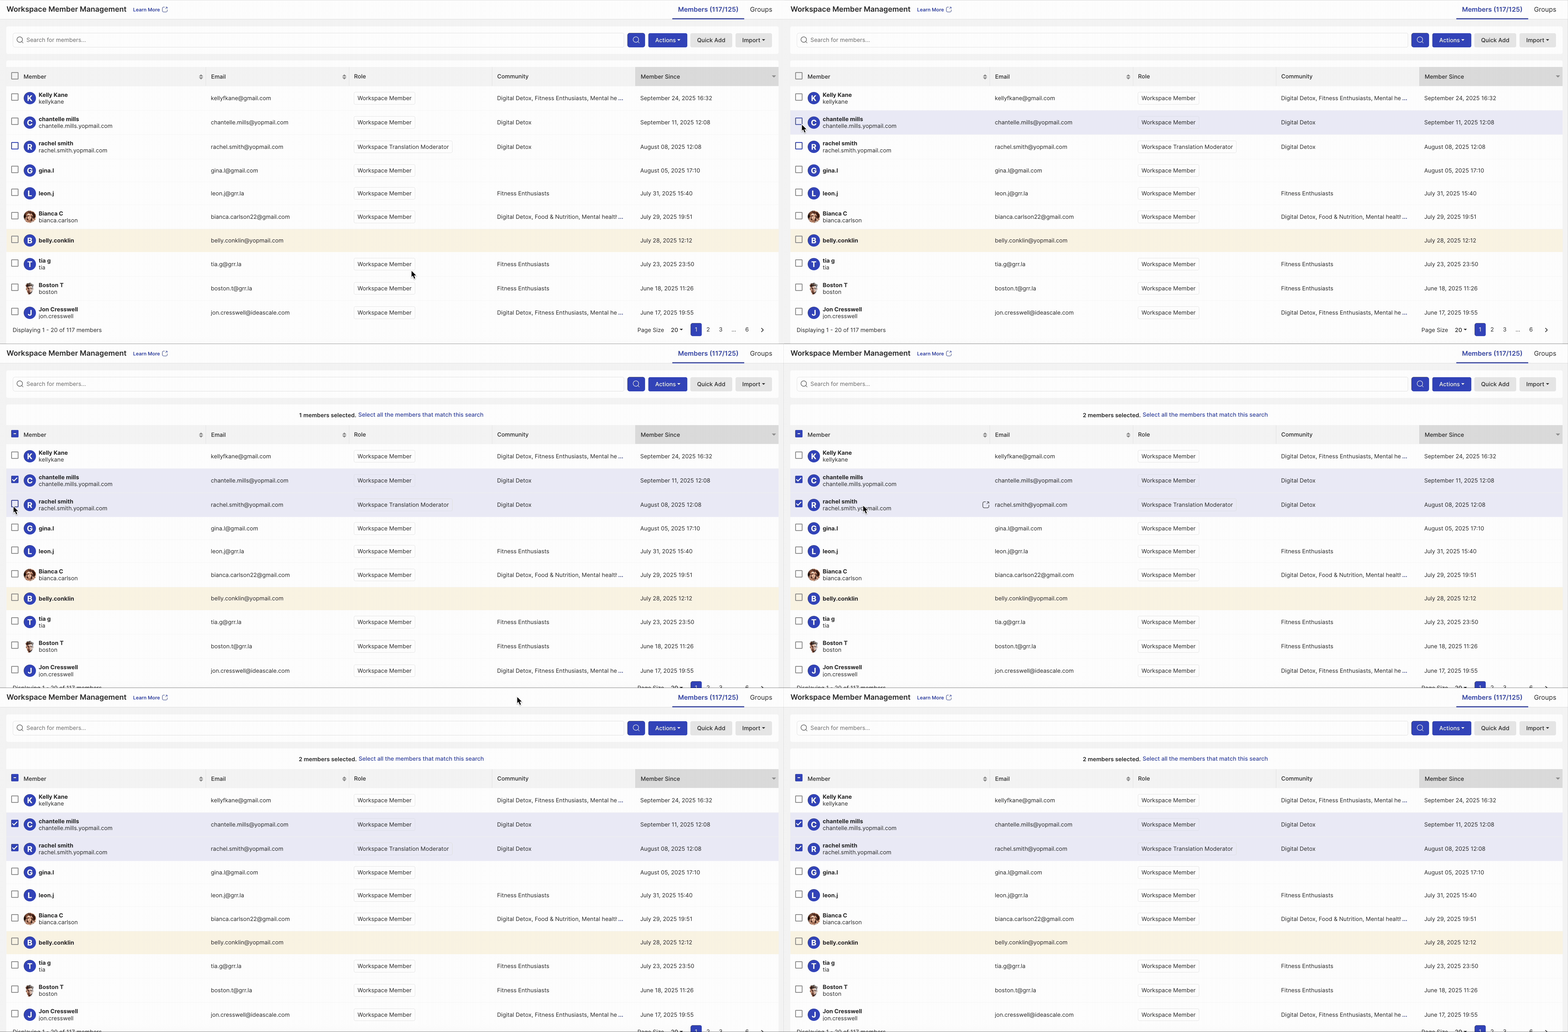
- All member selection: To select all the members for taking bulk action, select 1 member and then click on the Select all the members that match this selection link visible beside the selected member count.
.gif?width=670&height=294&name=Screen-Recording-2025-11-13-at-1%20(1).gif)
Action tab
The action tab allows to take various actions listed in a dropdown on the members of the Workspace. Simply select the members against whom action needs to be taken.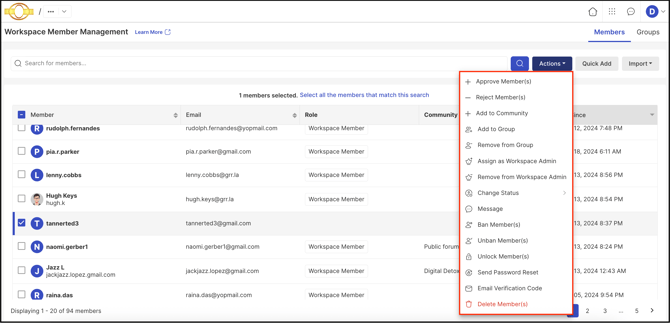
1. Approve Members: Select the members to approve by clicking on the check box next to the name and click on the action Approve Members.
2. Reject Members: Select the members to reject by clicking on the check box next to the name and click on the action Reject Members.
Light Mode
Dark Mode
Note: Pending members' rows are denoted by Yellow (Light mode) or Dark Yellow (Dark mode) background.
3. Add to Community: Select the members to be added and click on Actions >> Add community. A pop-up will appear to select communities to be assigned, select them and click on Add button.
Note: Only Approved/Active members can be added to a community. Pending members cannot be added before approval.
.gif?width=670&height=294&name=Screen-Recording-2025-11-13-at-1%20(2).gif)
4. Add to Group: Add members to the group by selecting them and click on Actions >> Add to Group. A pop-up will appear to select groups to be assigned, select single or multiple groups from the dropdown and click on Save button. If Workspace admin tries to add the existing group members to a group, system will show an alert message..gif?width=670&height=294&name=Screen-Recording-2025-11-13-at-1%20(3).gif)
If there are no groups created, the following message will appear upon using this option.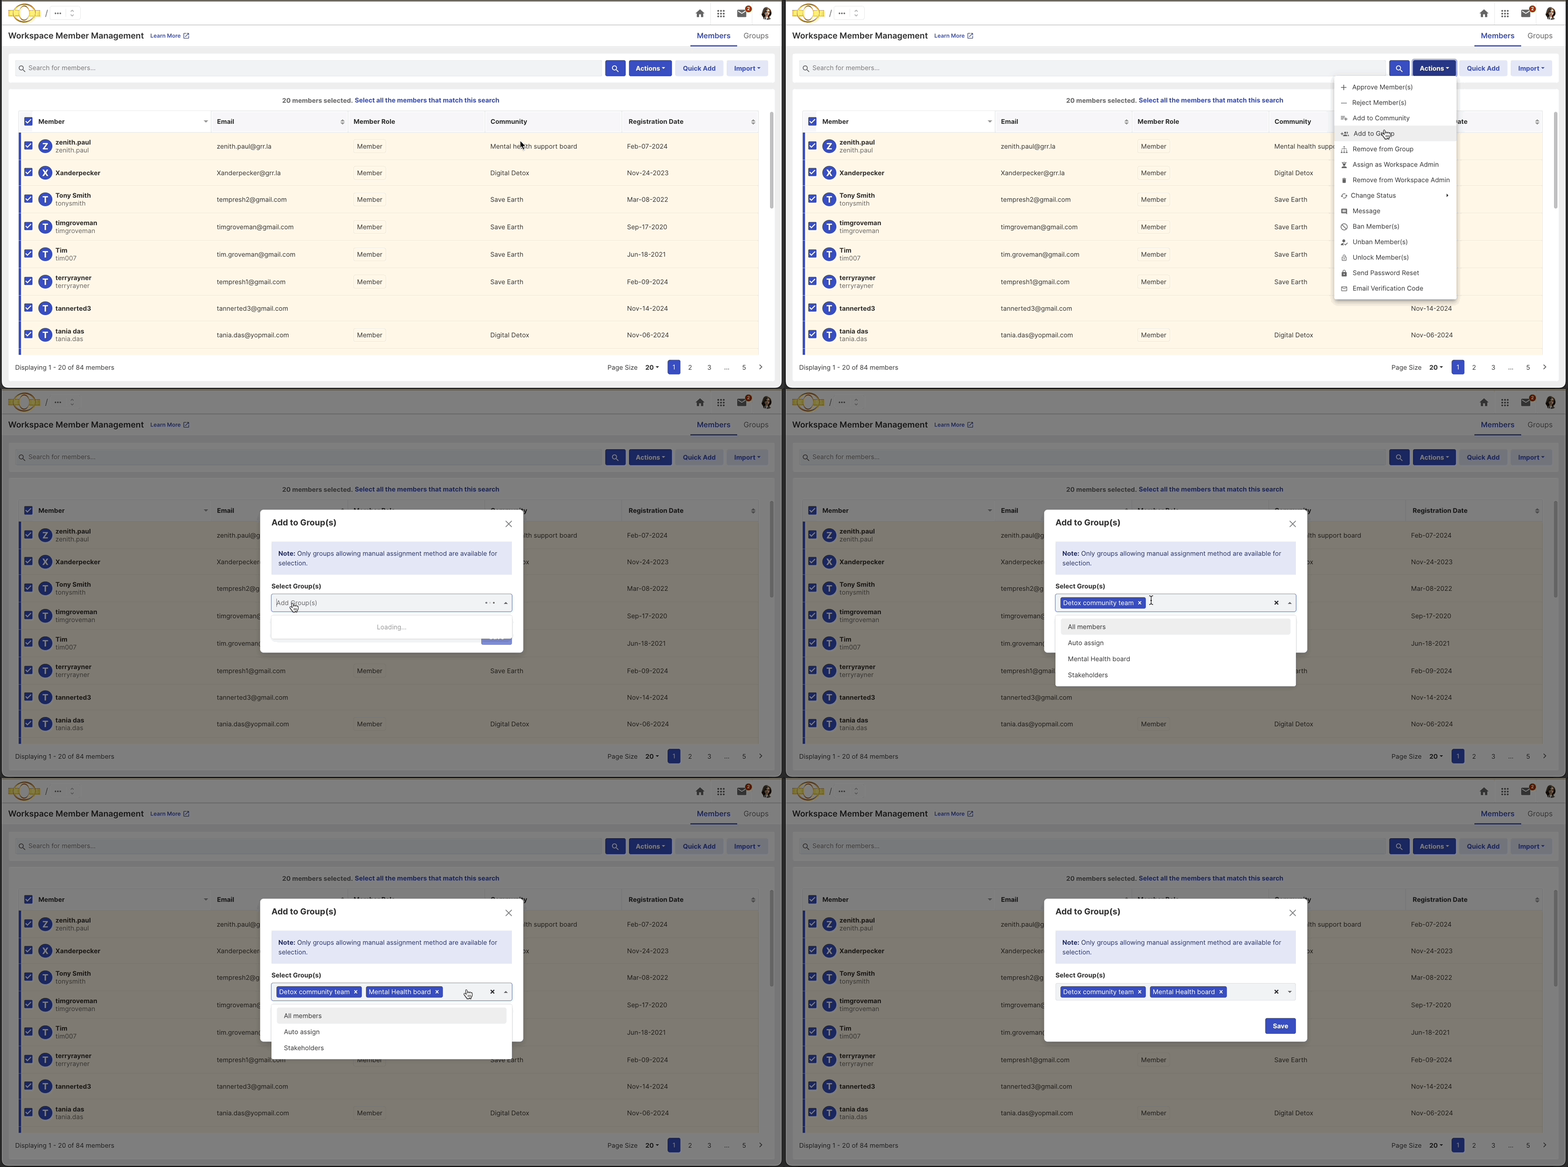
5. Remove from Group: Remove members from the group by selecting them and click on Actions >> Remove from Group. A pop-up will appear to select groups to be unassigned, select single or multiple groups from the dropdown and click on Save button..gif?width=670&height=294&name=Screen-Recording-2025-11-13-at-1%20(4).gif)
6. Assign as Workspace Admin: Assign a member(s) as Workspace Admin using this option.
7. Remove from Workspace Admin: Unassign a member(s) as Workspace Admin using this option.
Note:
- Workspace admins will be added as Community admins & Community moderators in all the communities within workspace by default.
- They cannot be unassigned from those roles unless unassigned as Workspace admins.
8. Change Status: Change the status of the members to Pending, Approved, or Banned.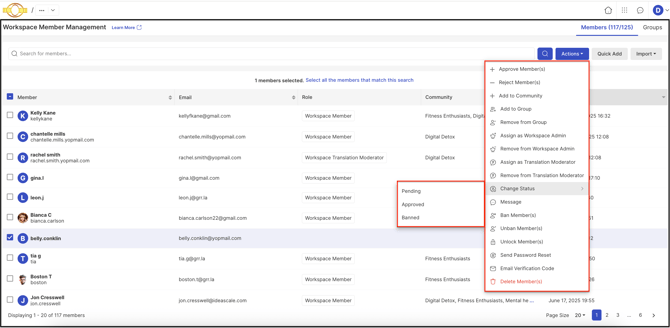
9. Message: The Workspace administrator can send messages to all the selected members..gif?width=670&height=294&name=Screen-Recording-2025-11-13-at-1%20(7).gif)
10. Ban Members: Workspace admin can ban a member using the option Ban Member option from the Action dropdown. .gif?width=670&height=294&name=Screen-Recording-2025-11-13-at-1%20(8).gif)
11. Unban Members: Ban members can be unbanned and made an approved member using this option.
12. Unlock Members: If a member has been locked due to inactivity or the wrong password, the Workspace admin can unlock them using this feature.
13. Send Password Reset: Sending a password reset email is simplified by clicking and selecting only those members who require a reset. Note: This option will not be available if the workspace is SSO-only.
14. Send Two Factor Auth Reset: A force 2FA reset email can sent to single or multiple members. Note: This option will be available only if 2FA authentication is enabled in the workspace.
15. Email Verification Code: Email verification codes for single or multiple members can be sent using this option. Note: This option will not be available if the workspace is SSO-only.
16. Delete Member: The Delete Member option offers two choices when removing a member: you can either delete the member alone or delete the member along with all their contributions.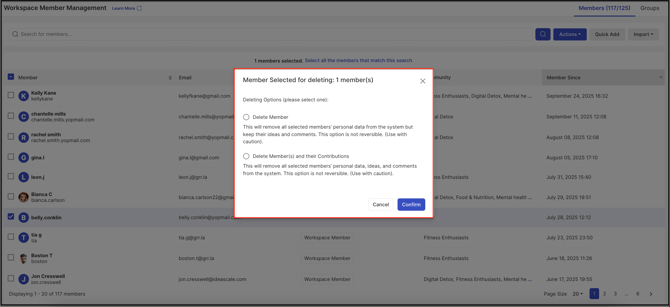
Quick Add tab
Use the quick add tab to add members by keying in the email address one below the other to add the to the Workspace. Maximum of 3000 email addresses can be added at a time.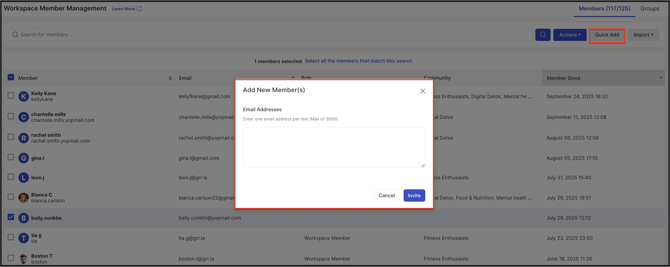
Import Tab
The Workspace Admin can bulk upload or Import members, Members' status, Usernames, Roles to the Workspace with the help of an Excel sheet. The Import Log will show the imports in progress.
Help articles on:
Import Log
The import log is where the Workspace Admin can find information about the internal processing that occurs during an import operation. The log includes information generated by the system:
- Import member: Import member's operation details information like time.
- Triggered By: The display name of who performed the import member operation.
- Total: Total import member count.
- Successful: Successfully imported member count.
- Already Member: Trying to import a member who already exists in the community, that existing member count.
- Invalid email: Invalid email address.
- Blocked Email Domain: Email count that are not imported due to blocked email domain
Member Details
Clicking on the member name will open up a side panel with member details..gif?width=670&height=294&name=Screen-Recording-2025-11-13-at-1%20(9).gif)
Help Article on Member Details Side Panel
Color Coding
The members are color-coded as per their member statuses.
Light Mode
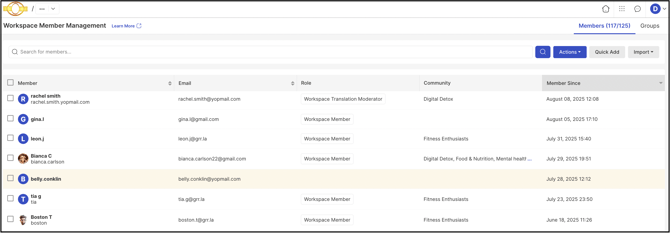
DarkMode

Yellow/ Dark Yellow - The member status is pending and needs approval.
White/Light Blue - Approved and active members
Last Updated: November 13, 2025