Path: Workspace Homepage >> Navigation Panel >> >> Campaigns >> Community >> Campaigns>> Workflow
The Workflow feature allows building multiple clearly defined stages inside the community. An individual workflow can be selected when creating a campaign to ensure that the most appropriate one is applied to a specific use case.
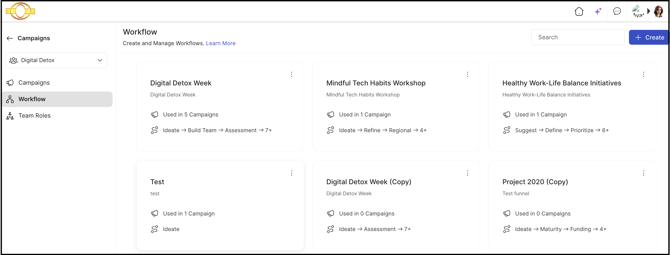
Clicking a specific workflow tile, a side drawer opens, displaying all of its stages in the order they occur. For each stage, the stage name, stage type, a description, and the number of ideas currently in that stage will appear. Community Admin can also view the list of campaigns that use a given workflow by clicking the information (i) button next to the Used In campaign count.

TABLE OF CONTENTS
Workflow Creation
Workflow Setup
Search Workflow
Edit Workflow
Clone Workflow
Delete Workflow
Select Workflow
Workflow Creation
To create a new workflow, select the + Create button and complete the following fields:
1. Workflow name: Enter a clear, specific name for the workflow. The name must be unique and should not exceed 50 characters.
2. Description: Provide a concise explanation of the workflow’s purpose, including any relevant instructions or guidance for how and when it should be used. It should not exceed 254 characters.

Once the workflow details are saved, the community admin will be taken to the workflow setup page to add stages to it.
Workflow Setup
The workflow setup page allows to create a detailed workflow with multiple stages. On this page, the community administrator can define a default stage for the workflow. This default stage is what members will see first when they navigate to the campaign associated with that workflow.If a workflow is already in use, the system displays an alert banner indicating how many campaigns are currently using that workflow. The Community Admin can review the specific campaigns associated with a workflow by clicking the View button.

1. Stage Setup: By default, an Ideate stage will be pre-populated to get started. Clicking on the stage will open up a side drawer to make changes to the stage.

Help article on Stage setup (To be linked)
2. Add Stage: The +Add Stage button and + button at the bottom of the existing stages opens up a dropdown with all the stage types listed.

Select a desired stage type to start the stage setup. Fill in all the details and then save.

Help article on Stage setup (To be linked)
3. Default Stage: The community administrator can either designate a specific stage as the default stage for a workflow or retain the All stages option as the default.

When a member visits the campaign page, the system will display all ideas from the stage selected under the Default stage setting. This configuration is applied consistently to all campaigns that use that workflow.

4. Reordering & Stage Separation
Community admin can reorder stages using a simple drag-and-drop interaction. Click the six-dot grid icon beside the stage, then drag it to the desired position in the sequence. Community admin can also drag one or more stages below the visibility line to create a visual separation from the rest of the workflow.

This separation can be used in several ways, such as grouping stages that represent a final phase, or highlighting stages that are closer to idea selection or implementation.

Search Workflow
When multiple workflows exist, locating a specific one can become time-consuming. The search bar allows community administrators to quickly narrow down the list by entering partial or complete keywords from the workflow name, making it easier to find the desired workflow.

Edit Workflow
Community Admin can modify existing workflows by selecting the Edit option, found under the More (three dots) menu on each workflow tile.

This opens the workflow editing page, where the community administrator can add stages, remove stages, reorder them, and modify the settings of individual stages.
Help article on Stage setup (To be linked)
Clone Workflow
Community Admin can clone an existing workflow by selecting the Clone option, found under the More (three dots) menu on each workflow tile.

This will create a duplicate workflow with all the stages and settings from the target workflow. The community admin can proceed to make changes to it using the Edit option.
Delete Workflow
An existing workflow can be deleted by selecting the Delete option, found under the More (three dots) menu on each workflow tile.

The system will prompt to confirm the deletion before permanently removing the workflow.
Note: A workflow cannot be deleted if it’s associated with any campaigns. Remove all campaign associations first, to delete.