Path: Workspace Homepage >> Navigation Panel >> Settings >> Security >> Authentication >> Single Signon >> SCIM
SCIM, or System for Cross-domain Identity Management, automates the sharing of user identity data across services. IdeaScale has developed a feature to enable SCIM for its SSO using clients.
TABLE OF CONTENTS
SCIM Functionality
IdeaScale Settings
SCIM Provisioning in IdP Application
FAQ
SCIM Functionality
SCIM operates on a client-server model where SCIM Server like IdeaScale acquires user data from SCIM Client - Identity Provider (IdP) using REST API. It helps lessen the workload for administrators by eliminating the need to manually create and update user accounts and groups in IdeaScale Workspace. It utilizes authentication methods, such as OAuth and basic authentication, to ensure secure communication between the IdP and IdeaScale.
It can perform CRUD operations as follows:
Create: The IdP creates a new user account within the IdeaScale using SCIM.
Read: The IdP retrieves existing user information from IdeaScale.
Update: The IdP updates user details (e.g., email address, password) within IdeaScale.
Delete: The IdP can deactivate/delete a user account within IdeaScale when their employment ends or access needs are revoked.
IdeaScale Settings
SCIM is only available for SSO enabled workspaces. There needs to be an active SSO setup in the Workspace to use it.
The workspace admin will be able to see the setting enabled under Workspace Homepage >> Navigation Panel >> Settings >> Security >> Authentication >> Single Sign On >> SCIM.

Copy the SCIM token to paste in the configuration settings of IdP application like Azure portal using the Copy icon.
Workspace admin can generate a new SCIM token using the Reload/Regenerate icon.
Note: Workspace admin cannot enable or disable SCIM setting for a workspace. Please contact your Customer Success Manager to do it.
SCIM Provisioning in IdP Application
The workspace admin need to have admin access in their IdP application to setup SCIM for IdeaScale. Below we have provided setup for SCIM in Azure and in Okta
SCIM in Azure
Following are the steps to setup SCIM in Azure portal:

2. Fill the following details to configure and then test the connection:
a. Select authentication method - Select desired authentication method.
b. Target URL - Enter the IdeaScale workspace URL followed by scim/v2 Example: https://ides.ideascale.com/scim/v2
c. Secret token - Paste the SCIM token generated in IdeaScale.


Note: Visibility of the pushed changes will be reflected in IdeaScale depending on the IdP Client policy (Real time, 40 mins or per day)
SCIM in Okta
Following are the steps to setup SCIM in Okta portal:
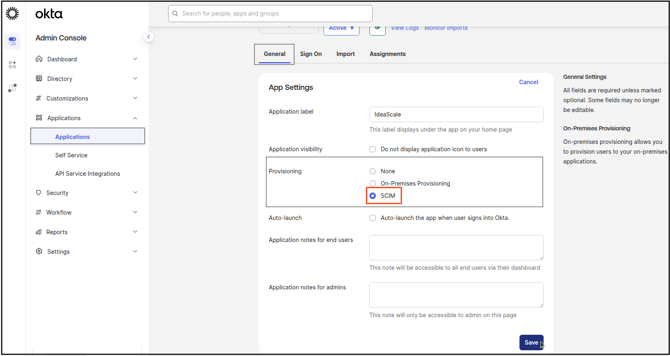
- To create a new Provisioning configuration for IdeaScale SSO, go to Applications >> General, select SCIM option under Provisioning and save.
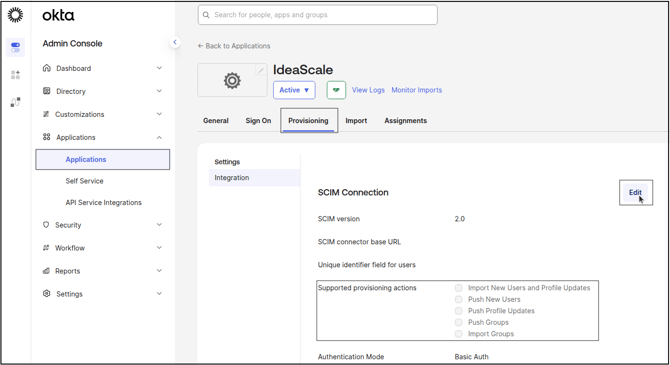
- Go to Provisioning tab (appearing upon saving SCIM) and click on Edit.
- Add the following steps:
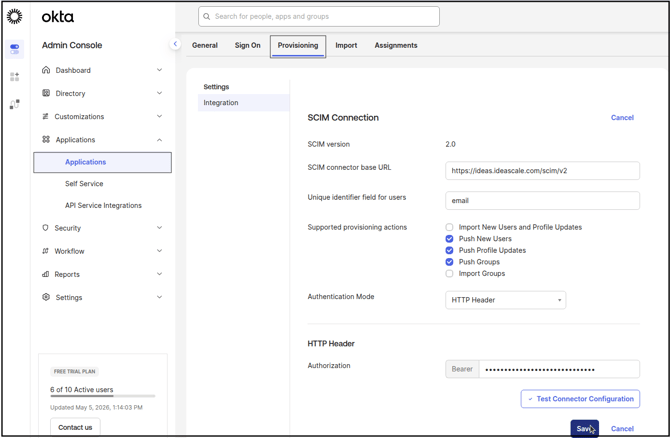
A. SCIM connector base URL: Enter the IdeaScale workspace URL followed by scim/v2 Example: https://ides.ideascale.com/scim/v2
B. Unique identifier field for users: Enter desired identifier field for user like email or username.
C. Supported provisioning actions: Enable actions that should be performed using SCIM. The Push options push data from Okta to IdeaScale where as the other to pull it from IdeaScale into Okta.
D. Authentication Mode: Select HTTP Header from the dropdown.
E. HTTP Header > Authorization: Paste the SCIM token generated in IdeaScale. - After you have saved these configuration details, select and enable the specific provisioning actions you want SCIM to perform (such as creating, updating, or deactivating users and groups), and then save the changes.

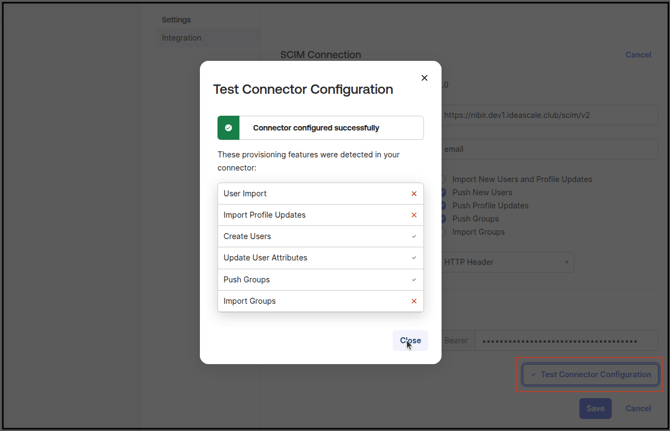
- After the configuration is completed, click Test Connector Configuration to verify that the connection has been set up correctly. This step confirms that the SCIM integration can communicate securely and reliably with IdeaScale. Once the test succeeds, click Save to store the settings and activate the configuration.
- Navigate to Assignments section and select Assign to people option from the dropdown. Select users from the pop-up modal to add them to IdeaScale.
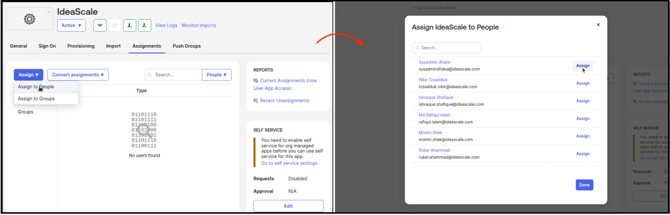
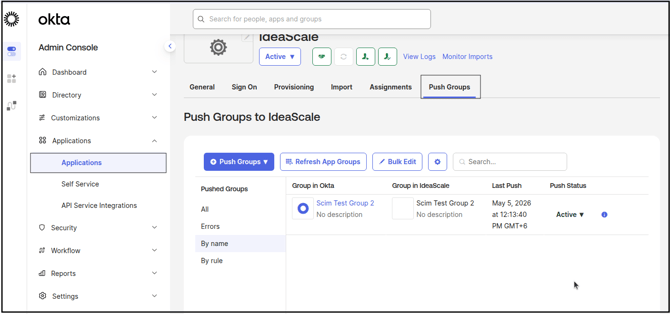
To assign groups, click on the Assign to Groups and select the group. This will assign all the members from the group. This will push only the members from the group; actual groups will not be pushed into IdeaScale - To push actual groups into IdeaScale, navigate to Push Groups tab and select the group to be pushed.
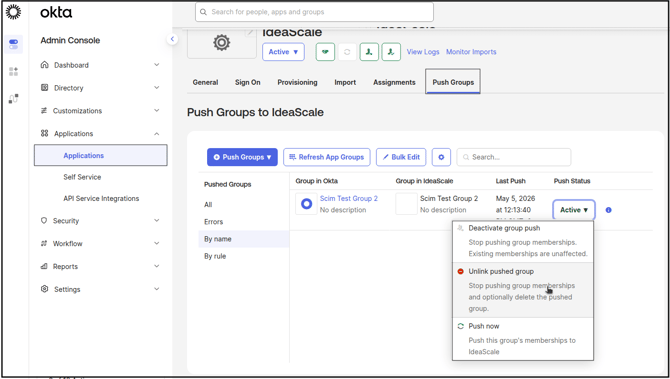
- To remove the pushed group from IdeaScale click on the Active dropdown under Push Status and select Unlink Pushed Group option. This will remove the group as well as the members from IdeaScale.
FAQ
1. User Deletion via SCIM:
When a user is deleted through SCIM, IdeaScale treats the action as a Ban, not a permanent Forget operation. This means the user is disabled from accessing the workspace, but their data is retained and the action can be reversed if needed.
2. Group Deletion via SCIM:
Yes, the group is deleted. When a group is deleted through SCIM, IdeaScale permanently deletes the group. This action is not reversible, so the group and its associated membership information are removed from the workspace.
3. Multiple SCIM Integrations:
Yes, it is possible to connect multiple SCIM providers.