
Path: Workspace Homepage >> Navigation Panel >> Campaigns >> Quick Campaign Setup
| What is Quick Campaign Setup? |
|---|
| Quick Campaign Setup is a streamlined flow for creating and launching a campaign in a few steps, without navigating through the full set of campaign configuration menus. |
Quick Campaign Setup lets an Administrator select campaign settings, define the target audience, and set a timeline from a single, condensed flow. It can be started directly from the Community Homepage or from within the standard campaign creation flow, and produces a fully functional campaign that can be further customized afterward.
Role Permissions
- Community Administrator, Campaign Administrator, Custom Administrator: Can create, edit and update a campaign.
TABLE OF CONTENTS
Entry PointsCampaign Details
Workflow Selection
Launching or Scheduling the Campaign
Post-Creation Customization
Frequently Asked Questions
Entry Points
Quick Campaign Setup can be started from either of two locations:
- Community Homepage: An option to launch Quick Campaign Setup is available directly on the Community Homepage
-
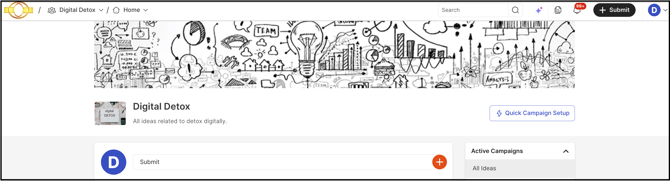
Campaign Settings: The Quick Setup option is also available from Campaign Settings, under the Add Campaign feature, as an alternative to Custom Setup.
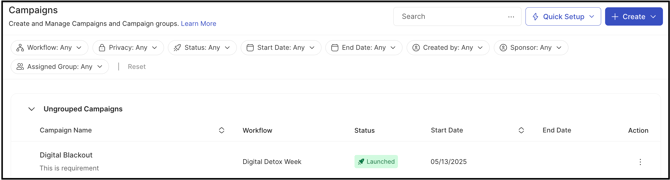
Both entry points open the same Quick Campaign Setup flow.
Campaign Details
The first page of Quick Campaign Setup collects the essential details needed to define the campaign:
- Campaign Title: The name given to the campaign.
- Question or Challenge Statement: The prompt or challenge members respond to with their ideas.
- Campaign Logo: The image used to represent the campaign.
- Campaign Banner: The banner image displayed on the campaign.
- Private: An optional switch to restrict the campaign to a defined audience rather than the full community.
- Approval Required for New Ideas: An optional switch requiring new idea submissions to be approved before they become visible.
.webp?width=670&height=708&name=Screenshot%202025-05-14%20at%208%20(1).webp)
Workflow Selection
The second page of Quick Campaign Setup sets the Workflow the campaign will follow. An Administrator can select from the following:
- New Workflow: A Workflow created specifically for this campaign.
- Existing Funnel: Any funnel already available within the community, selected from the list of existing funnels.
.webp?width=670&height=734&name=Screenshot%202025-05-14%20at%208%20(2).webp)
Launching or Scheduling the Campaign
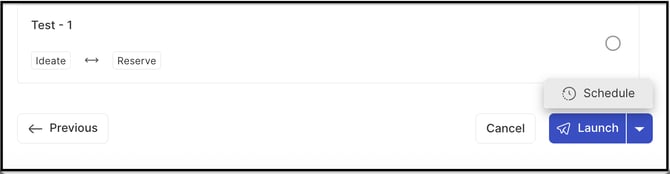
Selecting Launch creates and launches the campaign immediately. The Launch button also includes a dropdown with a Schedule option, which allows the campaign's launch to be set for a future date instead of immediately.
Post-Creation Customization
Once a campaign is created through Quick Campaign Setup, an Administrator can make additional customizations or modifications from the Manage Campaign page.
Help Article for Campaign ManagementFrequently Asked Questions
How is Quick Campaign Setup different from standard campaign creation?
Quick Campaign Setup condenses campaign creation into a two-page flow covering the essential Campaign Details and Workflow selection, so a campaign can be created and launched without navigating through the full set of campaign configuration menus. Additional settings can still be configured afterward from the Manage Campaign page.
Can settings entered through Quick Campaign Setup be changed after the campaign is created?
Yes. Once the campaign is created, an Administrator can make additional customizations or modifications from the Manage Campaign page.
Does Quick Campaign Setup require selecting an existing funnel?
No. On the Workflow Selection page, an Administrator can choose either to have a new Workflow created specifically for the campaign or to select from the funnels already available within the community.
Can the campaign launch be delayed instead of happening immediately?
Yes. The Launch button's dropdown includes a Schedule option, which sets the campaign to launch on a future date rather than immediately.
Related Articles