Path: Workspace Homepage >> Navigation Panel >> >> Campaigns >> Community >> Campaigns
A campaign serves as a designated category or container for ideas contributed by organization members, facilitating easy sorting by subject matter within the community. Use cases for campaigns encompass various aspects such as business functions (Sales, Marketing, Manufacturing, etc.), geographical regions (Northeast, Mid-Atlantic, Southeast, etc.), or idea types (Productivity Ideas, Fun Ideas, Profit Ideas).
The campaigns show up on the right side of the portal as seen in the screenshot below.
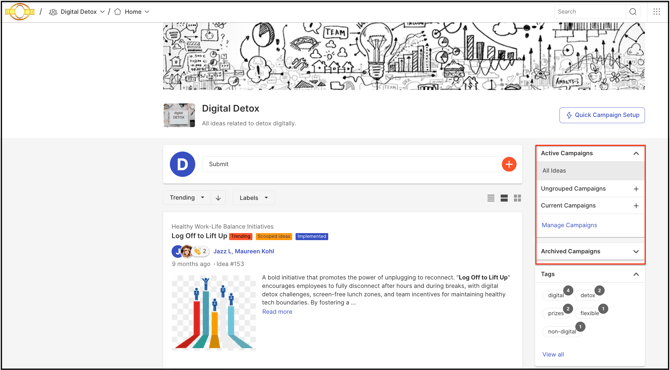
TABLE OF CONTENTS
Managing Campaigns
A. Search
B. Filters
C. Quick Setup
D. Create Campaign
E. Create Campaign Group
F. Action Tab
Creating and Editing Campaigns
A. Basic Information
B. Workflow
C. Settings
D. Submission Form
E. Email
F. Roles & Permissions
G. Schedule
Managing Campaigns
Managing campaigns can we easily done by the many features we have in our Campaigns settings. This include the following features as listed below:
A. Search
Use the search filter to find campaigns by campaign group name, campaign title, or campaign description. You can also search using just part of a name.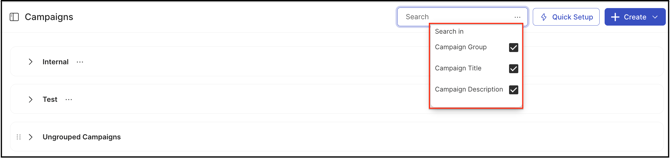
B. Filters
The campaigns can be searched using various filters for easily finding campaigns with specific conditions. The filters are as follows:

Workflow: Select the Workflow name.
Privacy: Select if the campaign is Public or Private
Status: Select if the campaign is Launched, Scheduled (Future start date), Draft (Not launched or scheduled) or Archived.
Start Date: Select the campaign's start date using date picker.
End Date: Select the campaign's end date using date picker
Created by: Select using checkbox who created the campaign from displayed admin list.
Sponsor: Select using checkbox the campaign sponsors from displayed list.
Assigned Group: Select assigned group from the list in case of Private campaign.
C. Quick Setup
The Quick Setup button allows the admin to create and configure a new campaign in just a few clicks.
Learn more about Quick Campaign Setup
D. Create Campaign
The Create button allows the admin to launch a new campaign with a single click and then configure its permissions and behaviors. 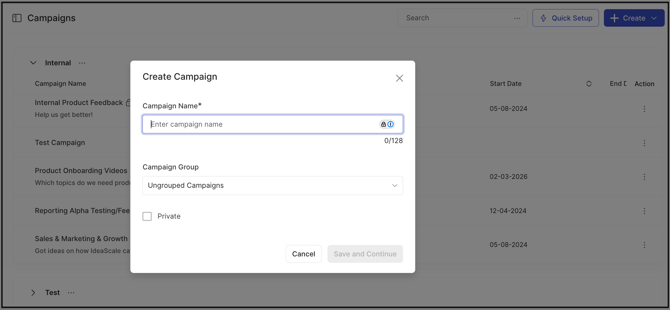
E. Create Campaign Group
The Create button allows the admin to launch a new campaign group with a single click and then configure its permissions and behaviors. Adding a campaign group helps to group all the related campaigns under one section for better operation and control of the campaigns.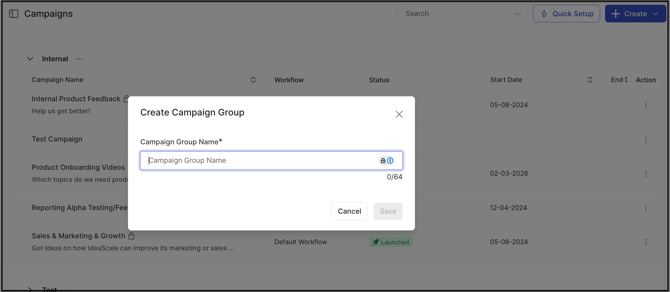
F. Action Tab
The action tab entails four actions as listed below:
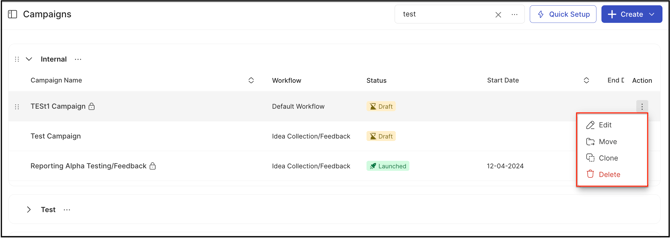
Edit
Campaigns, as well as their groups, can be edited or deleted by clicking on the respective links on the right side of the campaign name in Community settings. You can edit them even when they are active.
Move
The move option allows you to move campaign from one campaign group to another.
Delete
Delete campaigns by clicking the 'Delete' link, though once deleted all the ideas and data within this campaign will be deleted and this action cannot be undone.
Clone
To prevent the hassle of recreating a campaign with similar settings as an existing campaign, admin can use the Clone option.
Learn more about Campaign cloning
Reorder
It is possible to reorder the campaigns as well as campaign groups by simply dragging them up and down. The reordering will be reflected on the frontend/homepage too.
Creating and Editing Campaigns
This section describes the available campaign settings and the purpose of each, so you can configure highly tailored campaigns that align with your specific objectives. For ease of configuration and management, campaign settings are organized into separate tabs.
The tabs are as follows:
A. Basic Information
The first tab includes Basic information about the campaign.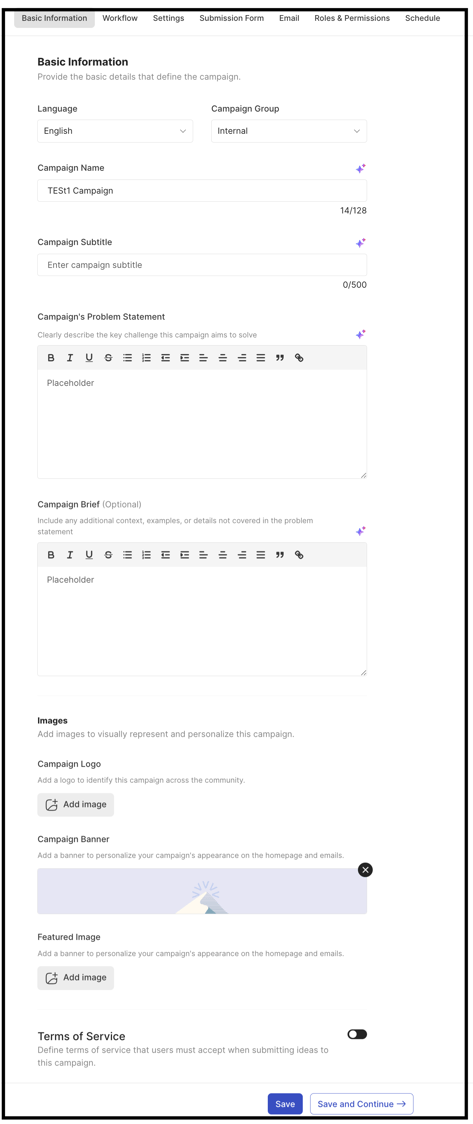
- Language: Allows the creation of a campaign in the supported language.
Note: The language selection only will only appear during campaign creation. It cannot be changed once the campaign is created. - Campaign Group: If the community has created different campaign groups, the community admin can select a specific campaign group. If not the campaign will be moved to the Ungrouped campaign section of the community.
- Campaign Name: A name has to be specified for the campaign.
- Campaign Subtitle: Add a text or line that will show just below the Title of the campaign.
- Campaigns Problem Statement: Providing a question or challenge statement summarizing the campaign's mission will attract the members to participate in the campaign.
- Campaign Brief: This section allows to write a detailed description that could not be mentioned in the Campaigns problem statement. This can have information about the campaign's mission, goal, context, and evaluation criteria.
- Campaign Logo: The campaign logo can be uploaded simply using the drag and drop option or choose an image from the file library if it is already uploaded there. The recommended size is 300 x 300 pixels. This logo will appear on the homepage as a thumbnail next to the campaign name. In case there is no logo (i.e. community, campaign) set then-campaign thumbnail logo will be the random image from the default selection.
Supported file formats for campaign banner or logo are JPG, PNG, GIF, and BMP. - Campaign Banner: Every campaign can be set up with a custom banner image. It will be visible on the campaign pages.
Community or Campaign admins can drag and drop the images from the computer or choose an image that is already uploaded in the file library. They need to enable the setting 'Choose an image from the file library'. To revert to a default selection, click the link below the images.
The uploaded images can be resized and readjusted using the image resizer.
It is possible to give a gradient to the banner as well as show the Page titles in Black instead of White if they are not prominent on the selected banner. Note: The campaign banner image will be set as an email banner for all the emails sent out related to that campaign.
- Featured Image: The campaign featured image is the visual representation of the campaign. It is recommended to use a square image with dimensions of 690x518 pixels.
Community & Campaign Admins can drag and drop the images from the computer or choose an image that is already uploaded in the file library, just disable the setting 'Choose an image from the gallery'. To revert to a default selection, click the link below the images. We also support animated GIFs!
The campaign feature image will be displayed on the home page in the About tab as well as in the Campaign invitation email that is sent to the users. Note: Apart from Basic info tab, the campaign name, campaign subtitle, banner, logo, featured image, and challenge statement can be changed from frontend using Edit mode. - Terms of Service: This section allows to create a set of rules for the campaign. Members will only be able to view and participate in the campaign after agreeing to the Terms of Service.
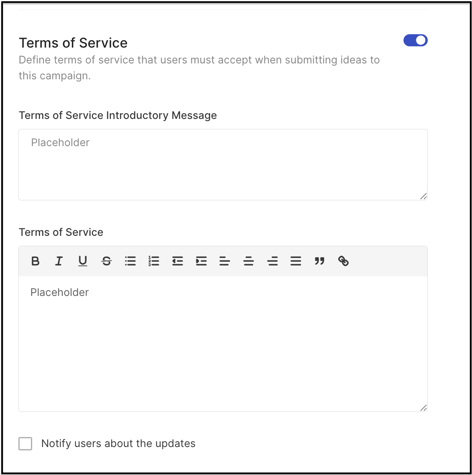
Note: Apart from Campaign brief tab, the campaign brief and TOS can be changed from frontend using Edit mode. Help Article on Edit Mode
B. Workflow
Workflows are nothing but different stages from which each idea goes through during the process of getting the best idea to the last stage. Workflow need to be set up in Workflow tab while setting a campaign. The community comes along with a default Workflow and a few stages. While setting up the campaign, community admin can opt for the workflow of choice by using the search bar. Once an idea is submitted to the campaign the workflow cannot be changed or altered.
In order to make changes to the workflow you are provided with 3 icons to the right of Workflow tab. These include Remove workflow, Replace workflow and Edit Workflow.
Help Article on Configuring Workflow
C. Settings
The Settings tab is divided into four sections—Ideas, Comments, Idea Tags, and Miscellaneous. Each section provides configuration options that allow admins to control how ideas, comments, and tags are managed within the campaign.
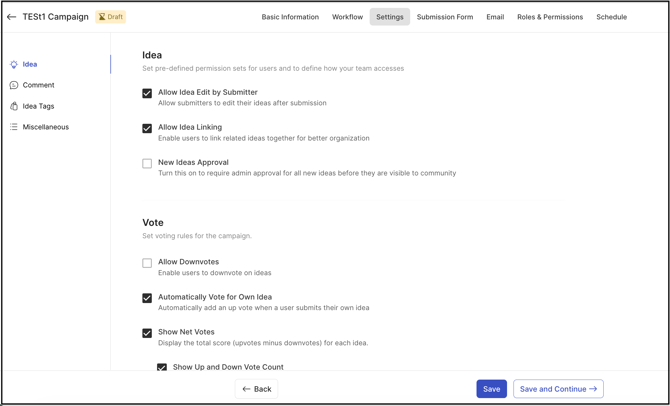
1. Idea
a.Idea
Allow Idea edit by submitter: The idea submitter will be allowed to edit the idea after the submission.
Allow Idea Linking: This allows you to link the ideas to related or similar ideas during idea submission.
New Ideas Approval: Enabling this will require each idea to be approved by a moderator before going live in the campaign for all members to view.
b. Vote
Allow Downvotes: Enabled to vote down on an idea.
Automatically vote for own idea: Idea submitter automatically votes on own idea as soon as idea is submitted.
Show Net Votes: Display the number of votes for an idea.
Show Up and Down Vote count: Enabling this setting displays the votes in Scale mode instead of Net Vote Count.
Show vote details in Idea activity tab: Includes the vote details in the Idea Details >> Activity tab.
2. Comment
Allow comment Votes: Enables users to vote on comments.
New Comments Approval: Enabling this will require each comment to be approved by a moderator before going live in the campaign for all members to view.
Allow Anonymous Commenting: Enables users to add comment anonymously.
3. Idea Tags

Idea Tagging: When enabled allows to turn ON tags related settings mentioned below.
a. User Tag Permissions
Allow users to create tags: Enables User applied tags that allows to assign tags to ideas.
Allow users to select from predefined tags: Allows users to assign tags from a pre-populate tag list created by admin. It has 2 additional settings
Community and Campaign Level Predefined Tags: It allows members to assign tags from both community and campaign level predefined tag list
Only Campaign Level Predefined Tags: It restricts the user to assign tags from the predefined list created for that campaign specifically.
b. Moderator Tag Permissions
Allow Moderators to create tags: Enables Moderator applied tags that allows to assign moderators tags to ideas.
Allow Moderators to select from predefined tags: Allows moderators to assign moderator tags from a pre-populate moderator tag list created by admin. It has 2 additional settings
Community and Campaign Level Predefined Tags: It allows moderators to assign moderator tags from both community and campaign level predefined moderator tag list.
Only Campaign Level Predefined Tags: It restricts the moderators to assign moderator tags from the predefined list created for that campaign specifically.
4. Miscellaneous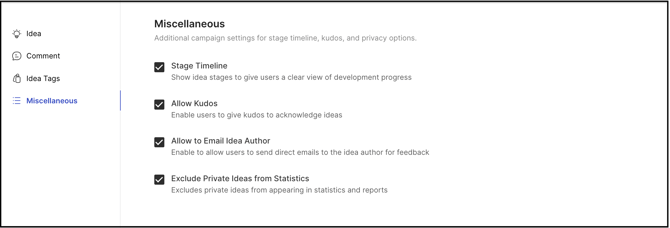
Stage Timeline: Enables the user to see a clear view and progression of the stage timeline.
Allow Kudos: Enables the users to give Kudos against ideas submitted.
Allow to Email Idea Author: Enabled the users to send direct email to the idea author.
Exclude Private Ideas from Statistics: Enabling this will exclude the private ideas from the statistics and reports of the campaign and community.
D. Submission Form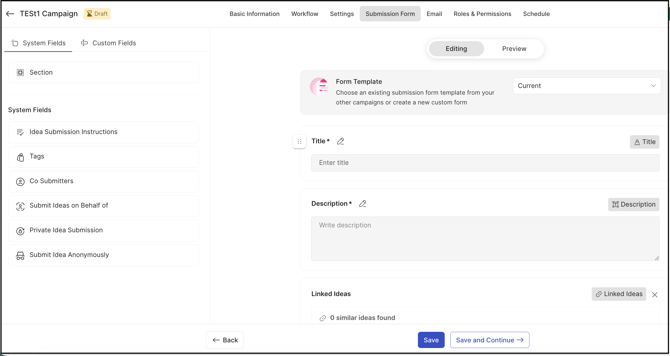
The submission form has two main sections. On the right, you’ll see the Submission Form editor with a live preview; on the left, you’ll find System Fields, Custom Fields, and Sections. These are all the elements that can be added to the form used to submit an idea.
The tool is designed as an intuitive drag‑and‑drop builder, allowing you to quickly update campaign forms. You can easily arrange and reorder questions to match your requirements by simply dragging each element into the desired position.
Help Article on Idea Submission Form
E. Email
The Email tab allows you to send personalized invitations for a specific campaign—either inviting users to participate or sending a thank-you message after submission.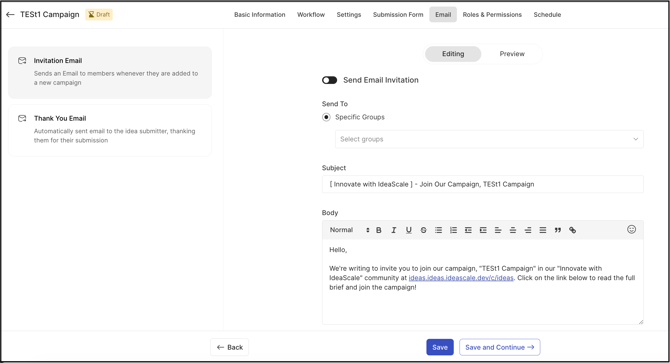
The invitation email includes the campaign banner, subject line, and body copy with key details about the campaign.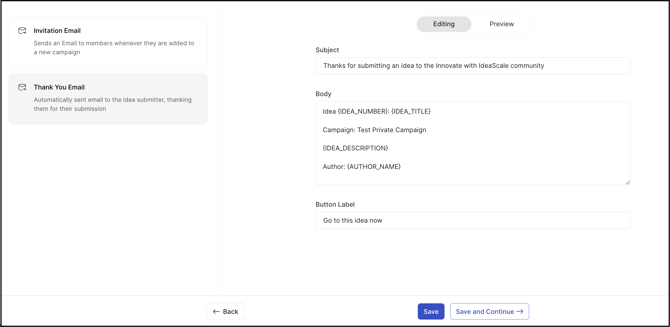
For a Thank You email, this setting allows the admin to customize the message that is sent in response to an idea submission.
F. Roles and Permissions
The Roles and Permissions tab is divided into two sections as Roles and Permissions which will be visible on the left side of the Campaign page.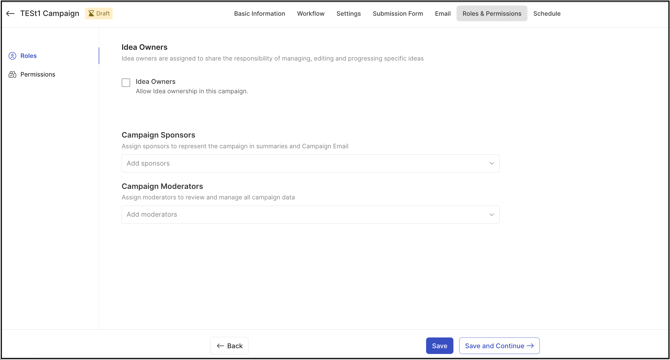
Roles: The roles included are Idea Owners, Campaign Sponsors and Campaign Moderators.
Idea owners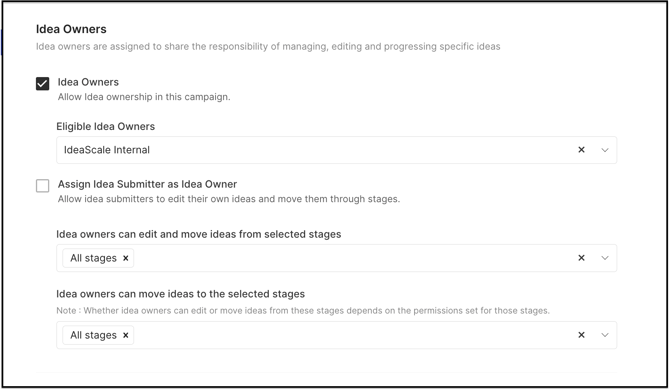
Idea Owners: Enabling this will allow idea ownership in this campaign and can be restricted to specific groups as selected in the dropdown.
Assign Idea Submitter as Idea Owner: Enabling this setting will assign the idea submitter as Idea owner automatically for the submitted idea.
Idea Owners can edit and move ideas from selected stages: Selecting stages from the dropdown allows idea owners to edit ideas and move them into the specified stages.
Idea Owners can move ideas to the selected stages: Selecting stages from the dropdown allows idea owners to move them into the specified stages.
Permissions: The Permissions tab shows whether the campaign is private or public and specifies which user groups can view ideas, submit ideas, add comments, and cast votes.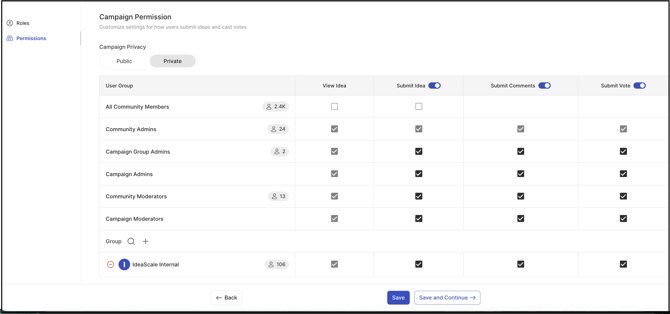
Admins can enable or restrict specific user actions with a single click by selecting the checkboxes next to each user group. They can also add user groups that are allowed to participate in the campaign and manage their permissions through the permissions table.
G. Schedule
The Schedule tab allows you to Launch or Archive the campaign using the button on the right side of the page.
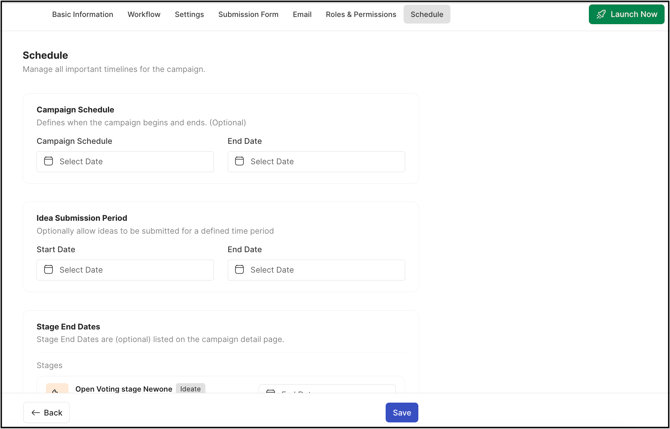
The Schedule tab consists of three main sections:
Campaign schedule: The admin can define the campaigns start and end date.
Idea Submission Period: The admin can define a period for the idea submission.
Stage End Dates: The admin can define a period for each stage in his campaign.
Archived Campaigns
Once a campaign has ended i.e. it is past the end date, it will become an archived campaign. This campaign will not be visible under the Active Campaigns list on the homepage. Instead, a new section called Archived Campaigns will show up on the homepage which houses all the expired campaigns.
.webp?width=270&height=303&name=Screenshot%202025-07-28%20at%2011%20(10).webp)
Community administrators, Global moderators, and campaign moderators (specific archived campaign moderators) can edit, add comments, and add an attachment to an idea. However campaign moderator (other active campaigns) and a standard user would be able to only view the ideas and comments, and no activity would be allowed.